AWS CloudWatch
Overview
The procedures in this topic describe how to enable the collection of AWS CloudWatch logging in ActiveEye.
Prerequisites
Before you can set up the AWS CloudWatch service connector in ActiveEye, you must set up one or more CloudWatch Logs subscriptions that send incoming log events to your Amazon Data Firehose delivery stream. The compressed files are delivered to an S3 bucket.
You must also create the CloudFormation Stack “activeeye-cloudwatch-ingestion,” which includes infrastructure for the initial collection and ingestion of CloudWatch logs into ActiveEye, and includes the following resources:
- A Kinesis Data Firehose for collecting the various CloudWatch log streams in a single location.
- An S3 bucket that will receive the logs from the Kinesis Data Firehose.
- One (or more) CloudWatch log group subscription filters that will send log groups to the Firehose.
To create the CloudFormation Stack:
- In the AWS console, in the upper-left corner of the screen, click Services.
- In the menu that appears, click Management & Governance, and then click CloudFormation.
The CloudFormation page appears. - Click the Create stack button, and then click With new resources.
The Create stack page appears.
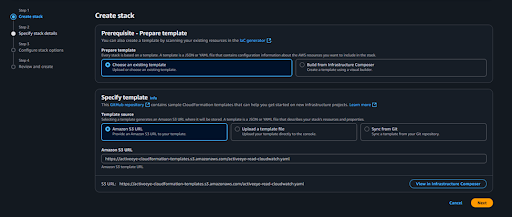
- With the Amazon S3 URL checkbox selected, depending on your environment, enter the appropriate text in the Amazon S3 URL box:
- For a commercial environment, enter the following: https://activeeye-cloudformation-templates.s3.amazonaws.com/activeeye-cloudwatch-ingestion.yaml
- For a government environment, enter the following: https://activeeye-cloudformation-templates.s3-us-gov-west-1.amazonaws.com/activeeye-cloudwatch-ingestion.yaml
- Click Next.
The Specify stack details page appears.
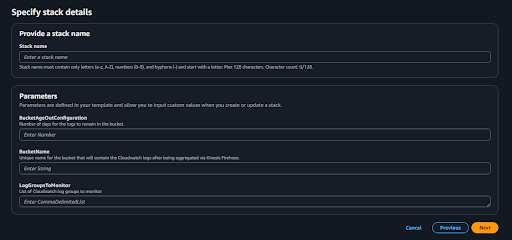
- In the BucketAgeOutConfiguration box, enter the number of days that the S3 bucket should hold data before it ages out.
- In the BucketName box, enter a unique name for the S3 bucket that will receive the CloudWatch logs. The name that you enter must meet the following criteria:
- Must be between 3 and 63 characters long.
- Can consist only of lowercase letters, numbers, periods, and hyphens.
- Must begin and end with a letter or number.
- Must not be formatted as an IP address (for example, 192.168.x.x).
- Must not start with the prefix xn--.
- Must not end with the suffix -s3alias.
noteRecord the BucketName value. It will be needed in subsequent procedures.
- In the LogGroupsToMonitor box, enter a comma-separated list of CloudWatch log group names. Any number of log group names can be entered. This will be used to generate the log group subscription filters.
- Click Next.
The Configure stack options page appears. - Do not modify the default options. Click Next.
The Review page appears. - Select the I acknowledge that AWS CloudFormation might create IAM resources with custom names checkbox, and then click Submit.
The stack is created, and a page displaying information about it appears.
For more information and to set up CloudWatch logging, refer to these AWS procedures:
To set up the service connectors in ActiveEye, you will need the AWS account ID for each AWS account that will be monitored by CloudWatch. To find the IDs, reference the following AWS procedure: Finding your AWS account ID.
Additionally, according to the AWS Well Architected Framework, it is best practice to use a centralized AWS logging account that is separate from the rest of the infrastructure as the owner of the logging S3 bucket. This allows permissions to be controlled, and promotes security. For ActiveEye, this is recommended but not required.
Creating a Service Connector for Each AWS Account
For each AWS account that will be monitored via CloudWatch, a corresponding service connector must be created in ActiveEye. This separates the data into distinctly monitored entities with differing priorities and statuses.
- In ActiveEye, in the left pane, click Admin, and then click Service Connectors.
The Service Connectors page appears.
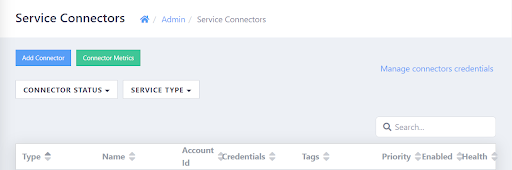
- In the upper-left corner of the page, click Add Connector.
A list of service connectors appears.
- Scroll down to the SYSTEMS & APPLICATIONS section, and then, in the AWS Cloudwatch subsection, click the Add Connection button.
The Add Connector Account page appears. - In the Display Name box, enter a unique name.
- In the Account Number box, enter the 12-digit AWS account ID. See the Prerequisites. section of this topic for information on how to find this ID.
- Optionally, modify the priority level in the Priority box. Raising or lowering the priority will increase or decrease the visibility of alerts related to this service connector.
- If you do not want data ingestion to begin immediately once cloud accounts have been configured, clear the Enable Account check box. Otherwise, leave the check box selected.
- Click Add.
The AWS CloudWatch service connector is created. - As needed, repeat these steps until an AWS CloudWatch service connector has been created for each AWS account that will be monitored.
Creating Connector Credentials for Each Service Connector
Next, for each CloudWatch service connector that you created, you must set up connector credentials in ActiveEye.
The credential does not need to be directly associated with the source AWS accounts. It is used for the assume role operation that is used to connect to and read from the bucket. This step needs to be performed only once per AWS account and bucket combination.
- In ActiveEye, in the left pane, click Admin, and then click Service Connectors.
The Service Connectors page appears.
- In the upper-right corner of the page, click Manage connectors credentials.
The Connector Credentials page appears.
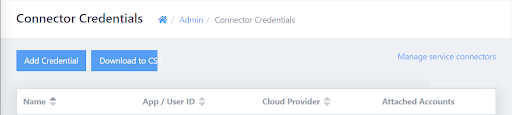
- In the upper-left corner of the page, click Add Credential.
The Add Connector Credentials page appears. - In the Connector Type drop-down list box, click AWS CloudWatch.
The AWS Cloudwatch Bucket Configuration section appears. - In the Display Name box, enter a unique name.
- In the Bucket Name box, enter the name of the S3 bucket that will receive the CloudWatch logs (which was created in the Prerequisites section.
- In the Bucket Account ID box, enter the 12-digit AWS account ID of the account that owns the S3 bucket that you referenced in the Bucket Name box.
- In the Bucket Region drop-down list box, select the AWS region in which the S3 bucket resides. For a comparison of region names and codes, reference this AWS topic: Available Regions.
- Click Add.
The AWS CloudWatch connector credentials are added, and the page is refreshed.
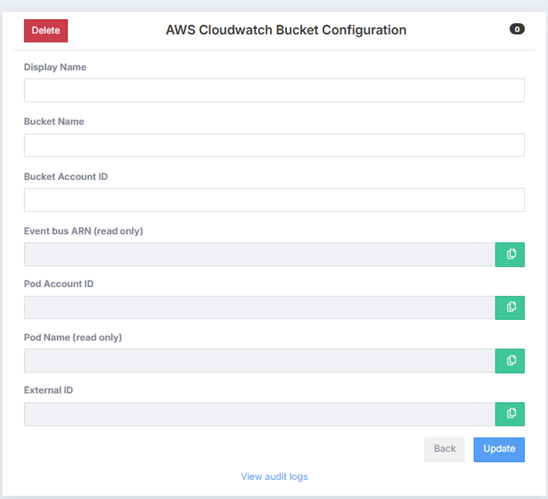
- Record the values in the Event bus ARN, Pod Account ID, Pod Name, and External ID boxes. You will need these values in subsequent procedures.
- As needed, repeat these steps for each AWS account that contains a bucket with CloudWatch logs that need to be monitored.
Creating CloudFormation Stack
After configuring a CloudWatch account that is publishing to your own S3 bucket, the following steps will need to be performed by an AWS IAM user with permissions to create CloudFormation Stacks, IAM Policies, and IAM Roles.
In this procedure, you will create a customer-managed policy named “activeeye-read-cloudwatch-policy” and a role that uses that policy named “activeeye-read-cloudwatch-role”. This role will have GetObject permissions on the S3 bucket of your choosing only.
This procedure will need to be performed for each AWS account that receives CloudWatch logs in an S3 bucket. For example, if your organization has three AWS accounts with CloudWatch that send logs to three S3 buckets in those same accounts, this step will need to be performed in each of those accounts. However, if your organization sends logs from the three accounts to a single AWS account that owns a single bucket, this procedure needs to be performed only once.
The CloudFormation template referenced below does not create a CloudWatch account. It is assumed that, if you already have an S3 bucket configured to receive logging, you already have a CloudWatch account enabled.
- In the AWS console, in the upper-left corner of the screen, click Services.
- In the menu that appears, click Management & Governance, and then click CloudFormation.
The CloudFormation page appears. - Click the Create stack button, and then click With new resources.
The Create stack page appears.
- With the Amazon S3 URL check box selected, depending on your environment, enter the appropriate text in the Amazon S3 URL box:
- For a commercial environment, enter the following: `https://activeeye-cloudformation-templates.s3.amazonaws.com/activeeye-read-cloudwatch.yaml`
- For a government environment, enter the following: `https://activeeye-cloudformation-templates.s3-us-gov-west-1.amazonaws.com/activeeye-read-cloudwatch.yaml`
- Click Next.
The Specify stack details page appears.
- In the Stack name box, enter the following: `activeeye-cloudwatch-read`
- In the ActiveeyeAccountID box, enter the Pod Account ID that you recorded in the previous procedure.
- In the CloudwatchBucket box, enter the name of the S3 bucket receiving the log files (do not include a path, prefixes, or trailing forward slashes).
- In the ExternalBusARN box, enter the Event Bus ARN that you recorded in the previous procedure.
- In the ExternalID box, enter the External ID that you recorded in the previous procedure.
- Click Next.
The Configure stack options page appears. - Do not modify the default options. Click Next.
The Review page appears. - Select the I acknowledge that AWS CloudFormation might create IAM resources with custom names check box, and then click Submit.
The stack is created, and a page displaying information about it appears. - Repeat this procedure for each AWS account that contains a bucket with CloudWatch logs that needs to be monitored.
The External ID is not a secret in any way. It is simply an additional security measure that AWS recommends when allowing third parties to interact with your AWS resources. For more information on External IDs, reference this AWS blog post: How to Use External ID When Granting Access To your AWS Resources.
After you complete this procedure, when ActiveEye receives a notification to pull a file from a bucket, it will be able to associate the bucket with your customer account, and will have the permissions to read the file from the S3 bucket.
Enabling ActiveEye to Use the KMS Key
If a customer-managed KMS key is not used to encrypt the CloudWatch logs, you can skip to the Verifying ActiveEye Event Ingestion procedure.
Recording the AWS KMS Key
If the AWS CloudWatch configuration utilizes customer-managed KMS keys for server-side encryption, the role and key policy must be edited to allow ActiveEye to decrypt the objects prior to reading the contents.
For situations where the target S3 bucket resides in a different account from the source CloudWatch accounts, it is best practice to use the S3 bucket owner’s KMS key for encryption.
To determine if your CloudWatch logs are encrypted with KMS, access the AWS Console, and then select S3. Then, select the S3 bucket that is the destination for the Amazon Data Firehose delivery stream, and access its Properties menu. In the Default encryption section (as seen in the following image), check if encryption is Enabled.

Record the AWS KMS key value, which you will need in a subsequent procedure.
To add a KMS key to an existing CloudWatch account, reference this AWS procedure: Encrypt log data in CloudWatch Logs using AWS Key Management Service.
Editing the IAM Policy
- In the AWS console, in the upper-left corner of the screen, click Services.
- In the menu that appears, click Security, Identity, & Compliance, and then click IAM.
The IAM page appears. - In the left pane, click Policies.
A table displaying policies appears. - Click activeeye-read-cloudwatch-policy.
The Summary page appears. - Click Edit policy.
The Edit page appears. - Click the JSON tab, and then, in the JSON code, after the first }, add the following code. Ensure that you include the comma noted below. In the following code, substitute the word KMSKEYARN with the AWS KMS key value that you recorded in the previous procedure.
           ,
            {
                "Sid": "DecryptCloudwatchKms",
                "Effect": "Allow",
               "Action": [
                    "kms:Decrypt"
                ],
                "Resource": [
                    "KMSKEYARN"
                ]
} - Click Review policy.
- Click Save changes.
The policy is updated.
Recording the ARN Value of the Role
- In the AWS console, in the upper-left corner of the screen, click Services.
- In the menu that appears, click Security, Identity, & Compliance, and then click IAM.
The IAM page appears. - In the left pane, select Roles.
A table displaying roles appears. - Click activeeye-read-cloudwatch-role.
The Summary page appears. - Record the ARN value that appears in the middle of the page. You will need it in the next procedure.
Editing the KMS Key Policy
- In the AWS console, in the upper-left corner of the screen, click Services.
- In the menu that appears, click Security, Identity, & Compliance, and then click Key Management Service.
The Key Management Service page appears, displaying a table of customer-managed keys. - Click the alias of the KMS key that is associated with your CloudWatch account.
A page displaying information about the key appears. - In the Key policy section, click the Edit button, and then, in the code, before the final ], add the following code. Ensure that you include the comma noted below. In the following code, substitute the word ROLEARN with the ARN value that you recorded in the previous procedure.
           ,
            {
                "Sid": "Allow ActiveEye to Decrypt Cloudwatch logs",
                "Effect": "Allow",
                "Principal": {
                    "AWS": "ROLEARN"
                },
                "Action": "kms:Decrypt",
                "Resource": "*"
} - Click Save changes.
The KMS key policy is updated.
Verifying ActiveEye Event Ingestion
Data should now begin flowing into ActiveEye within a few minutes, depending on how frequently CloudWatch writes logfiles.
To verify that data is flowing into ActiveEye from CloudWatch, in ActiveEye, select INVESTIGATE in the left pane, and then, in the Preset Investigations section, in the Cloud Infrastructure subsection, select Overview. Scroll down to the bottom of the Dashboard page that appears and, in the table, look for events with the prefix AWS CloudWatch. If these events appear, data is flowing. Note that this page does not automatically refresh.
If you suspect an issue with the data flow, follow these troubleshooting steps.
Troubleshooting
If events have not started flowing into ActiveEye, verify the following:
- Recent CloudWatch logfiles are appearing in the S3 bucket.
- The CloudFormation stack was successfully created with the correct bucket name in the AWS account that “owns” the S3 bucket.
- The role activeeye-read-cloudwatch-role and policy activeeye-read-cloudwatch-policy appear in IAM in the AWS account that owns the S3 bucket.
- In the ActiveEye connector credential record, verify that the bucket name is spelled correctly, and that the AWS account ID of the S3 bucket owner and the External ID match those used in the CloudFormation stack.
- In the ActiveEye service connector record, verify that the AWS account ID matches the source CloudWatch account.
- When the steps above have been completed, wait until at least 10 minutes have elapsed, and then check for results.
- If CloudWatch is configured to use a customer-managed KMS encryption key, verify that the role and KMS policies have been updated as defined in the Enabling ActiveEye to Use the KMS Key section of this document.
Contact ActiveEye Engineering for further help troubleshooting this issue. For fastest resolution, please provide screenshots of the AWS configurations mentioned above.